


Contents
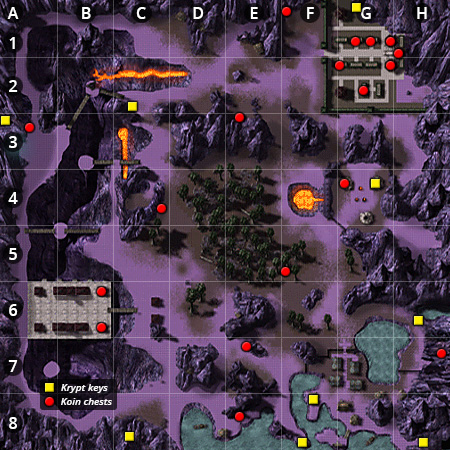
Outworld Map
Your second journey into Outworld has a vastly different objective than your initial visit.
Once you step through the portal into Outworld, head east toward the green aura. This will lead you to the city of Lei Chen, where you will find Hotaru pacing back and forth. After approaching him, he will tell you that he has driven off the Tarkatan horde for the time being, but they will most likely regroup in the near future and resume their assault. He then goes on to say that Overlord Zeffeero did not recall his agreement to hand over the control of Lei Chen to Seido. As punishment for his forgetfulness, Hotaru has stripped him of his position and appointed the rule of this city to Seido. He then excuses himself, as he needs to get to work on establishing rules for governing this city.
After your conversation with Hotaru, leave the city of Lei Chen and head toward the green aura to the west. As you leave the gates of Lei Chen, you will be stopped by a gang of Tarkata who order you to come with them and not to resist.
They will lead you into a Tarkatan camp that was previously inaccessible. Within its boundaries you will encounter Baraka who is infuriated by your actions. He tells you that you were told to convince Overlord Zeffeero to surrender, not to bring reinforcements. Shujinko retorts by telling Baraka that he had no right to take anything out on the people of Lei Chen. Baraka then says he should let his soldiers tear you to pieces, to which Shujinko says that Baraka should do it himself. If he is then victorious, he must agree to do one favour for you. Baraka agrees to Shujinko’s terms, and a fight ensues. You must now defeat Baraka in two rounds. When you successfully defeat him, you will receive a sum of 500 random koins for your victory. Shujinko then reveals that his ‘favour’ is for Baraka to teach him his fighting techniques.
Training: Baraka
The fighting styles I will show you are but a taste of Tarkatan might. I will begin with Silat basic high attacks.
- Quick Punch: 1
- Vertical Elbow: 2
- Thai Knee: 3
- Front Sidekick: 4
You will now learn low attacks. Begin with these Silat basic low attacks.
- Ducking Cross Punch: 1
- Crouching Kick: 3
- Low Demon Spinkick: 4
- Ankle Kick: 3
- Dragon Sweep: 4
The Tarkata are the embodiment of brutality. We will now teach you Silat power and pop-up attacks.
- Spinning Elbow: 1
- Nomad Cross: 1
- Frontwards Elbow: 2
- Rising Uppercut: 2
- Jumping Roundhouse: 3
You have learned much! But we have taught you only single attacks. You will now learn Silat basic combos.
- Steel Punches: 1, 1
- Head Spinner: 1, 2
- Rocky Road: 1, 3
Excellent! You have mastered Tarkatan basic combos. Let us see how you fare with more advanced Silat combos.
- Triple Takeout: 1, 1, 1
- Speedy Elbow: 1, 1, 2
- Silat’s Salute: 1, 1, 4
Mission completed! You will now receive a koin reward of 50 random koins.Enough! Now for the basic high attacks of the Hung Gar fighting style.
- Scratching Palms: 1
- Chameleon Palm: 2
- Spinning Hook Kick: 3
- Twisting Sidekick: 4
Now for Hung Gar basic low attacks.
- Low Scratch: 1
- Slithering Foot: 3
- Leg Trip: 4
- Tiger Tail Kick: 3
- Leg Take Out: 3
- Spinning Roundhouse Kick: 4
Next, learn these Hung Gar power and pop-up attacks.
- Double Claw Strike: 1
- Hammerfist Lift: 2
- Leaping Frog Legs: 4
Well done. Now for Hung Gar basic combos.
- Clearing Space: 1, 2
Not bad, human! Now try Hung Gar advanced combos.
- Hot Palms: 1, 1
- Taking Out Your Eyes: 1, 2
Mission completed! You will now receive a koin reward of 75 random koins.My Blades my seem awkward to a human, but they are as natural to me as any other part of my body.
- Downwards Slash: 1
- Throat Slash: 2
- Scarlet Swing: 3
- Spinning Sidekick: 4
We are impressed! Finally, the Blade basic low attacks.
- Low Scissors: 1
- Toe Slash: 3
- Shin Stab: 4
- Demon Sweep: 4
Finally, we will teach you these devastating Blade power and pop-up attacks.
- Mid-Ripper: 1
- Face Impaler: 1
- Send Them Flying: 2
- Chest Slash: 2
- Crouching Dual Stab: 2
- Up And Beyond: 3
- Get The Point: 3
Finally, show me you can handle Blade basic combos.
- Slashing Wind: 1, 1
- Mithril Metal: 2, 2
- Long Tips: 2, 1
- Cyclone: 3, 3
Next you will master my Blade advanced combos.
- Frenzy Slashes: 2, 1, 1
- Khan’s Warrior: 3, 3, 2
- Baraka’s Special: 3, 3, 4
- Dark Void: 3, 3, 2, 1
- Outworld Walker: 3, 3, 2, 2
Mission completed! You will now receive a koin reward of 100 random koins.Most impressive! But can you handle style-branching combos? These change from one fighting style to the next during the attack.
- Sneaky: 3,
Now for a different style branching combo.
- Suffering Blades: 1, 2, , 3, 2, 1, 1
Mission completed! You will now receive a koin reward of 125 random koins.Now you must complete another style-branching combo that spans all the Tarkatan fighting styles.
- 1, 1, 2 … 1, 1, 3,
Mission completed! You will now receive a koin reward of 125 random koins.This next lesson will teach you our more advanced fighting moves.
- Flying Shard: , 1
- Flying Shard: , 1
Well done. Now try this one!
- Mutant Blades: , 3
- Mutant Blades: , 3
This next special attack is not as easy.
- Chop Chop Blades: , 3
- Chop Chop Blades: , 3
In battle, you may be required to use any of our Tarkatan special attacks at any given time. Attack me with all four of them. I will enjoy watching you fail.
- Mutant Blades: , 3
- Flying Shard: , 1
- Chop Chop Blades: , 3
- Mutant Blades: , 3
- Flying Shard: , 1
- Chop Chop Blades: , 3
Mission completed! You will now receive a koin reward of 150 random koins.For your final test, you must defeat me in battle…FIGHT!
- Fight and defeat Baraka in one round
Mission completed! You will now receive a koin reward of 200 random koins.Once training has ended Baraka tells Shujinko that he must keep the rest of his techniques to himself. He then tells you that he will allow you safe passage from this encampment, and that once you leave this realm you must never return. Shujinko agrees to Baraka’s terms.
Face east and enter the hut directly in front of you in G-4. Inside you will find a gold chest containing a key for koffin GC (unlocks Jade’s Alt Costume).
Now leave the Tarkatan encampment. Before we walk through the portal we have a few side missions to take care of.
Side Mission
Locate a suitable cave in which Tanya can trap Liu Kang
Head west-southwest toward A-7. Here you will find Tanya who has been instructed by Shinnok to find a suitable cave in which to trap Liu Kang. She will reward you with koins if you find one for her.
Solution:
Return to the Tarkatan camp in G-4. In the southeast corner of the encampment you will see a path that leads to a cave in H-5. Approach the entrance to the cave to trigger a cutscene in which Shujinko says this cave will be suitable to trap Liu Kang. Take the Map To A Cave back to Tanya who will reward you with 600 koins.Side Mission
Return with a vampire’s location
In B-6 you will find a robed man carrying a bloodied dagger and a book. He excuses himself for his odd request, and asks that if you find a vampire that you inform him of its location.
Solution:
Return to the cave in H-5 close to the Tarkatan camp where you just found a cave for trapping Liu Kang. Enter the cave, and at the very end you will find Nitara. She admits to being a vampire, and questions Shujinko on why he is interested. Now, return to the robed man who will reward you with 600 koins.Head north toward the green aura and step into the portal. Once you return to the Nexus, step forward to trigger a cutscene. Damashi will appear, telling Shujinko that for his services to the Elder Gods thus-far, they are offering him the opportunity to compete in the Mortal Kombat tournament in Earthrealm and defeat Shang Tsung. He says that Shujinko will have a greater chance of defeating Shang Tsung than the warrior he used to worship as a child (Kung Lao), as he has absorbed the fighting styles of many warriors during his quest.
When the conversation has ended, enter the green portal to return to Earthrealm.